Introduction
Welcome to the Popdeem iOS SDK Documentation
Integrate Popdeem into your mobile app today! Our integration is simple and fast - you can be up and running in under 30 minutes. If you are new - Request a Demo to see what we can do.
Installing Dependencies
In PODFILE, add the following lines:
    pod 'PopdeemSDK'
    pod 'PopdeemSDK/UIKit'
We use cocoapods to deliver the Popdeem SDK. To include the SDK in your project, add the following lines to your Podfile, and run pod install.
Info.plist Additions
    <key>FacebookAppID</key>
    <string>YOUR_FACEBOOK_APP_ID</string>
    <key>FacebookDisplayName</key>
    <string>YOUR_FACEBOOK_DISPLAY_NAME</string>
    <key>FacebookUrlSchemeSuffix</key>
    <string>YOUR_FACEBOOK_URL_SCHEME_SUFFIX</string>
    <key>InstagramClientId</key>
    <string>YOUR_INSTAGRAM_CLIENT_ID</string>
    <key>InstagramClientSecret</key>
    <string>YOUR_INSTAGRAM_CLIENT_SECRET</string>
    <key>InstagramCallback</key>
    <string>YOUR_INSTAGRAM_CALLBACK</string>
URL Types
<key>CFBundleURLTypes</key>
<array>
    <dict>
        <key>CFBundleURLSchemes</key>
        <array>
            <string>twitterkit-{YOUR_TWITTER_APP_CONSUMER_KEY}</string>
            <string>Your facebook app id, prefixed by 'fb' with your suffix appended on the end. eg: fb163515583134popdeem</string>
        </array>
    </dict>
</array>
LSApplicationQueriesSchemes
<key>LSApplicationQueriesSchemes</key>
    <array>
        <string>instagram</string>
        <string>fb</string>
        <string>fbapi</string>
        <string>fb-messenger-share-api</string>
        <string>fbauth2</string>
        <string>fbshareextension</string>
        <string>twitter</string>
        <string>twitterauth</string>
    </array>
Camera, Photos & Location Permissions
    <key>NSCameraUsageDescription</key>
    <string>We use your camera to take photos</string>
    <key>NSLocationWhenInUseUsageDescription</key>
    <string>We use your location to deliver local rewards</string>
    <key>NSPhotoLibraryUsageDescription</key>
    <string>We use your photos for sharing</string>
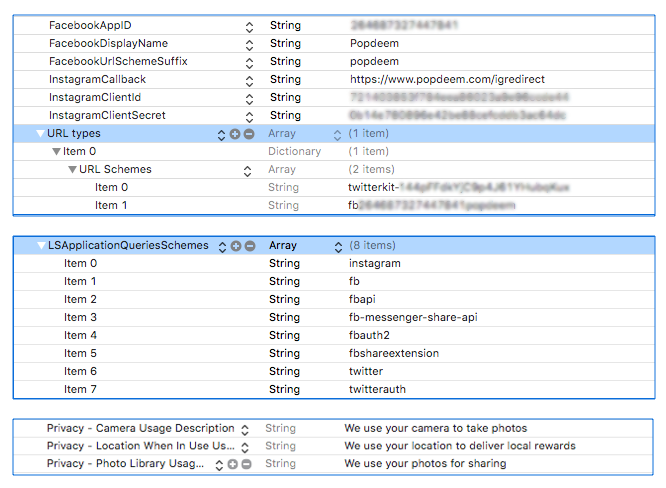
In order for social login to work correctly, it is necessary to add the following keys and values to your info.plist file.
It is also necessary to take the steps described in item 2 here: Facebook Application Queries Schemes Setup.
The completed info.plist will look like the following image:
Initialise SDK
- (BOOL)application:(UIApplication *)application didFinishLaunchingWithOptions:(NSDictionary *)launchOptions {
    ...
    ...
    [PopdeemSDK withAPIKey:@"YOUR_POPDEEM_API_KEY"];
    [[FBSDKApplicationDelegate sharedInstance] application:application didFinishLaunchingWithOptions:launchOptions];

    return YES;
}
func application(_ application: UIApplication, didFinishLaunchingWithOptions launchOptions: [UIApplicationLaunchOptionsKey: Any]?) -> Bool {
    ...
    ...
    PopdeemSDK.withAPIKey("YOUR_POPDEEM_API_KEY")
    FBSDKApplicationDelegate.sharedInstance()?.application(application, didFinishLaunchingWithOptions: launchOptions)

    return true
}
Initializing the SDK is as simple as adding these lines to your application: didFinishLaunchingWithOptions: method in AppDelegate:
Broadcast Features
Enable Features
Enable Broadcast Features
- (BOOL)application:(UIApplication *)application didFinishLaunchingWithOptions:(NSDictionary *)launchOptions {
    ...
    ...
    [PopdeemSDK registerForPushNotificationsApplication:application];
    return YES;
}
func application(_ application: UIApplication, didFinishLaunchingWithOptions launchOptions: [UIApplicationLaunchOptionsKey: Any]?) -> Bool {
    ...
    ...
    PopdeemSDK.register(forPushNotificationsApplication: application)
    return true
}
To enable broadcast features, add the initialization code in the didFinishLaunching method of AppDelegate.
Popdeem Notifications - Navigate to Social Rewards
[[NSNotificationCenter defaultCenter postNotificationName:PopdeemNotificationReceived object:self];
When your app receives a push notification from Popdeem's backend, the Popdeem SDK will send the following NSNotification: PopdeemNotificationReceived
Add Observer for NSNotification
[[NSNotificationCenter defaultCenter] addObserver:self selector:@selector(navToSocialRewardsAfterNotification:) name:PopdeemNotificationReceived object:nil];
NotificationCenter.default.addObserver(self, selector: #selector(self.navToSocialRewardsAfterNotification),
name:PopdeemNotificationReceived, object:nil)
If you want to navigate the user to the Social Rewards section of your app you will need to add an observer that listens for the above NSNotification.
Add Selector for the above Observer
- (void)navToSocialRewardsAfterNotification:(NSNotification *)notification {

    NSLog(@"Popdeem Notification Received - Navigate to Social Rewards");
    //Perform navigation to Social Rewards section inside your app.
}
func navToSocialRewardsAfterNotification(notification: NSNotification) -> Void {

    NSLog("Popdeem Notification Received - Navigate to Social Rewards");
    //Perform navigation to Social Rewards section inside your app.
}
The selector for this observer should be a method that navigates the user to the Social Rewards section inside your app.
Delegate Methods
Add The Following Delegate Methods
- (void) application:(UIApplication *)application didRegisterForRemoteNotificationsWithDeviceToken:(NSData *)deviceToken {
    ...
    //Your registration code, must fall through
    ...
    [PopdeemSDK application:application didRegisterForRemoteNotificationsWithDeviceToken:deviceToken];
  }

  - (void) application:(UIApplication *)application didFailToRegisterForRemoteNotificationsWithError:(NSError *)error {
    ...
    //Your failure code, must fall through
    ...
    [PopdeemSDK application:application didFailToRegisterForRemoteNotificationsWithError:error];
  }

  - (void) application:(UIApplication *)application didReceiveRemoteNotification:(NSDictionary *)userInfo {
    ...
    //Your handling code, must fall through
    ...
    if ([[userInfo objectForKey:@"sender"] isEqualToString:@"popdeem"]) {
      [PopdeemSDK handleRemoteNotification:userInfo];
      return;
    }
  }

- (BOOL) application:(UIApplication *)app openURL:(NSURL *)url options:(NSDictionary<NSString *, id> *)options
{
    BOOL handled = [[FBSDKApplicationDelegate sharedInstance] application:app openURL:url options:options];

    // Add any custom logic here.
    if (handled) return handled;

    if ([PopdeemSDK application:app canOpenUrl:url options:options]) {
        return [PopdeemSDK application:app openURL:url options:options];
    }
    return NO;
}
func application(_ application: UIApplication, didRegisterForRemoteNotificationsWithDeviceToken deviceToken: Data) {
    ...
    //Your registration code, must fall through
    ...
    PopdeemSDK.application(application, didRegisterForRemoteNotificationsWithDeviceToken: deviceToken)
}

func application(_ application: UIApplication, didFailToRegisterForRemoteNotificationsWithError error: Error) {
    ...
    //Your failure code, must fall through
    ...
    PopdeemSDK.application(application, didFailToRegisterForRemoteNotificationsWithError: error)
}

func application(_ application: UIApplication, didReceive notification: UILocalNotification) {
    ...
    // Your handling code, must fall through
    ...
    if (userinfo["sender"] == "popdeem") {
        PopdeemSDK.handleRemoteNotification(userInfo)
    }
}


func application(_ app: UIApplication, open url: URL, options: [UIApplication.OpenURLOptionsKey : Any] = [:]) -> Bool {

    let handled = FBSDKApplicationDelegate.sharedInstance().application(app, open: url, sourceApplication:
        options[.sourceApplication] as? String, annotation: options[.annotation])

    // Add any custom logic here.
    if handled {return handled}

    if PopdeemSDK.application(app, canOpen: url, options: options) {
        return PopdeemSDK.application(app, open: url, options: options)
    }

    return false
    }
The following delegate methods must also be added to AppDelegate.
Login Flow
Popdeem Social Login
[PopdeemSDK enableSocialLoginWithNumberOfPrompts:3];
PopdeemSDK.enableSocialLogin(withNumberOfPrompts: 3)
To trigger the Popdeem login flow, add the following line of code:
The numberOfPrompts parameter denotes how many times you wish to ask the user to log in if they have dismissed the login pop-up. A value of 3 will result in a user seeing the login popup at most 3 times.
Provided all of the social networks have been configured correctly, this login flow will result in the user being logged in via one of the social providers.
Facebook Login Option
    FBSDKAccessToken *fbtoken = [FBSDKAccessToken currentAccessToken];
    NSString *tokenString = fbtoken.tokenString;
    NSString *userID = fbtoken.userID;

    [PopdeemSDK setFacebookCredentials:tokenString facebookId:userID];
    let fbtoken = FBSDKAccessToken.current()
    let tokenString = fbtoken?.tokenString
    let userID = fbtoken?.userID

    PopdeemSDK.setFacebookCredentials(tokenString, facebookId: userID)
If your app already allows users to login via Facebook, you can use the following method to automatically log these users into Popdeem & social rewards.
You just need to call setFacebookCredentials and pass the Facebook access_token and user_id.
Navigate to Social Rewards after Social Login
[[NSNotificationCenter defaultCenter postNotificationName:SocialLoginTakeoverUserLoggedIn object:self];
When a user logs into a social account via the social login screen, the Popdeem SDK will send the following NSNotification: SocialLoginTakeoverUserLoggedIn
Add Observer for NSNotification
[[NSNotificationCenter defaultCenter] addObserver:self selector:@selector(navToSocialRewards:) name:SocialLoginTakeoverUserLoggedIn object:nil];
NotificationCenter.default.addObserver(self, selector: #selector(self.navToSocialRewards),
name:SocialLoginTakeoverUserLoggedIn, object:nil)
If you want to navigate the user to the Social Rewards section of your app you will need to add an observer that listens for the above NSNotification.
Add Selector for the above Observer
- (void)navToSocialRewards:(NSNotification *)notification {

    NSLog(@"Navigate to Social Rewards");
    //Perform navigation to Social Rewards section inside your app.
}
func navToSocialRewards(notification: NSNotification) -> Void {

    NSLog("Navigate to Social Rewards");
    //Perform navigation to Social Rewards section inside your app.
}
The selector for this observer should be a method that navigates the user to the Social Rewards section inside your app.
Non-Social Users
When you initialize the Popdeem SDK, a non-social user is created and registered on Popdeem. This allows you to track which of your app users have converted to Social.
Social Home
All of Popdeem's core mobile features are contained in the Home flow. There are various scenarios in which you may launch the Home flow.
Navigation Controller Implementation
[PopdeemSDK presentHomeFlowInNavigationController:self.navigationController];
PopdeemSDK.presentHomeFlow(in: self.navigationController)
The most native way to present the Home flow is to push it into your existing navigation controller heirarchy. If you are already working inside a Navigation Controller, simply use this line in your View Controller to trigger the Home flow:
Tab Bar Implementation
If you are setting the Popdeem Rewards Home as a view on your Nav Bar, there is a slightly different method. When you have chosen which Tab Bar Item will be your Popdeem Home, in interface builder, make the root View an instance of PDUIHomeViewController. This will result in your app launching with Popdeem preloaded in your tab bar.
Deliver Third Party Token
[PopdeemSDK setThirdPartyUserToken:@”tokenstring”];
PopdeemSDK.setThirdPartyUserToken("tokenstring")
We may need you to deliver a user token. If so, you can do this by using this method:
Custom Event Trigger
[PopdeemSDK logMoment:@”post_payment”];
PopdeemSDK.logMoment("post_payment")
We have created the ability for the your app to inform the Popdeem platform when certain events have occurred. We have identified post payment as a significant event in which Popdeem can take some action. The action taken can be configured on the Popdeem Platform and is flexible. Directly after a user has made a payment or completed a transaction in the your app, you should execute the following code:
Theme
theme.json
{
  "popdeem" : {
    "colors" : {
      "primaryAppColor" : "#000000",
      "secondaryAppColor" : "#E91F4A",
      "primaryInverseColor" : "#E91F4A",
      "viewBackgroundColor" : "#FFFFFF",
      "primaryFontColor" : "#000000",
      "secondaryFontColor" : "#A2A4A6",
      "navBarTintColor" : "#000000",
      "segmentedControlBackgroundColor" : "#FFFFFF",
      "segmentedControlForegroundColor" : "#E91F4A",
      "homeHeaderTextColor" : "#FFFFFF",

      "buttonsColor" : "#E91F4A",
      "rewardActionColor" : "#A2A4A6"

    },
    "images" : {
      "loginImage" : "pd_social_login_image",
      "socialLogin1" : "pd_social_login_image_1",
      "socialLogin2" : "pd_social_login_image_2",
      "socialLogin3" : "pd_social_login_image_3",
      "settingsHeaderImage" : "pd_settings_header_image",
      "dismissLoginImage" : "pduikit_x_black",
      "defaultItemImage" : "pduikit_starG",
      "homeHeaderImage" : "pd_header_image",
      "gratitudeConnect1" : "pd_gratitude_connect_image_1",
      "gratitudeCoupon1" : "pd_gratitude_coupon_image_1",
      "gratitudeCreditCoupon1" : "pd_gratitude_credit_image_1",
      "gratitudeSweepstake1" : "pd_gratitude_sweepstake_image_1",

      "socialLoginVariation" : "pd_social_login_design_variation_1",
      "socialLoginTransition" : "pd_social_login_transition_1"
    },
    "fonts" : {
        "primaryFont" : "Avenir-Book",
        "boldFont" : "Avenir-Bold",
        "lightFont" : "Avenir-Light",

      "titleFontSize" : "20",
      "bodyFontSize" : "17"
    },
    "nav" : {
      "useTheme" : "true"
    }
  }
}
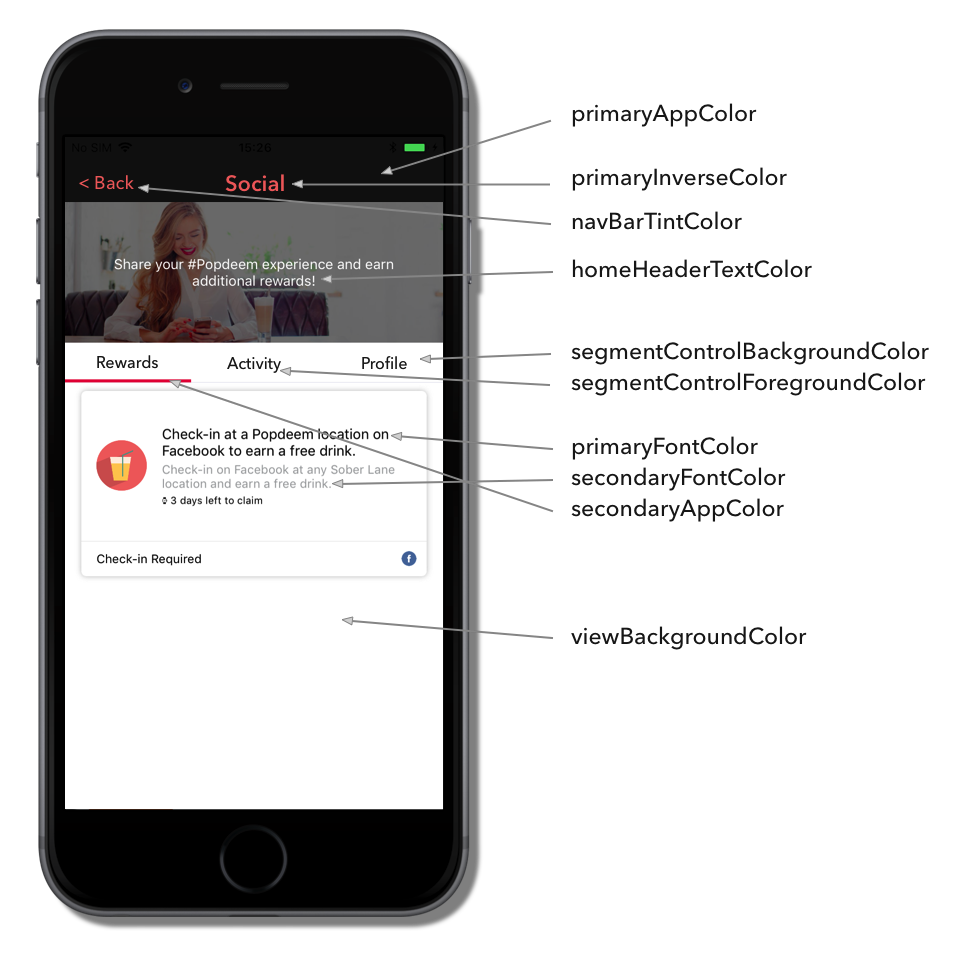
To integrate Popdeem into your iOS application, you can make use of our theming system. To implement your own theme, copy the sample theme.json file and change the colours & images to suit. ---->
Colors
      "primaryAppColor" : "#000000",
      "secondaryAppColor" : "#E91F4A",
      "primaryInverseColor" : "#E91F4A",
      "viewBackgroundColor" : "#FFFFFF",
      "primaryFontColor" : "#000000",
      "secondaryFontColor" : "#A2A4A6",
      "navBarTintColor" : "#000000",
      "segmentedControlBackgroundColor" : "#FFFFFF",
      "segmentedControlForegroundColor" : "#E91F4A",
      "homeHeaderTextColor" : "#FFFFFF"
Images
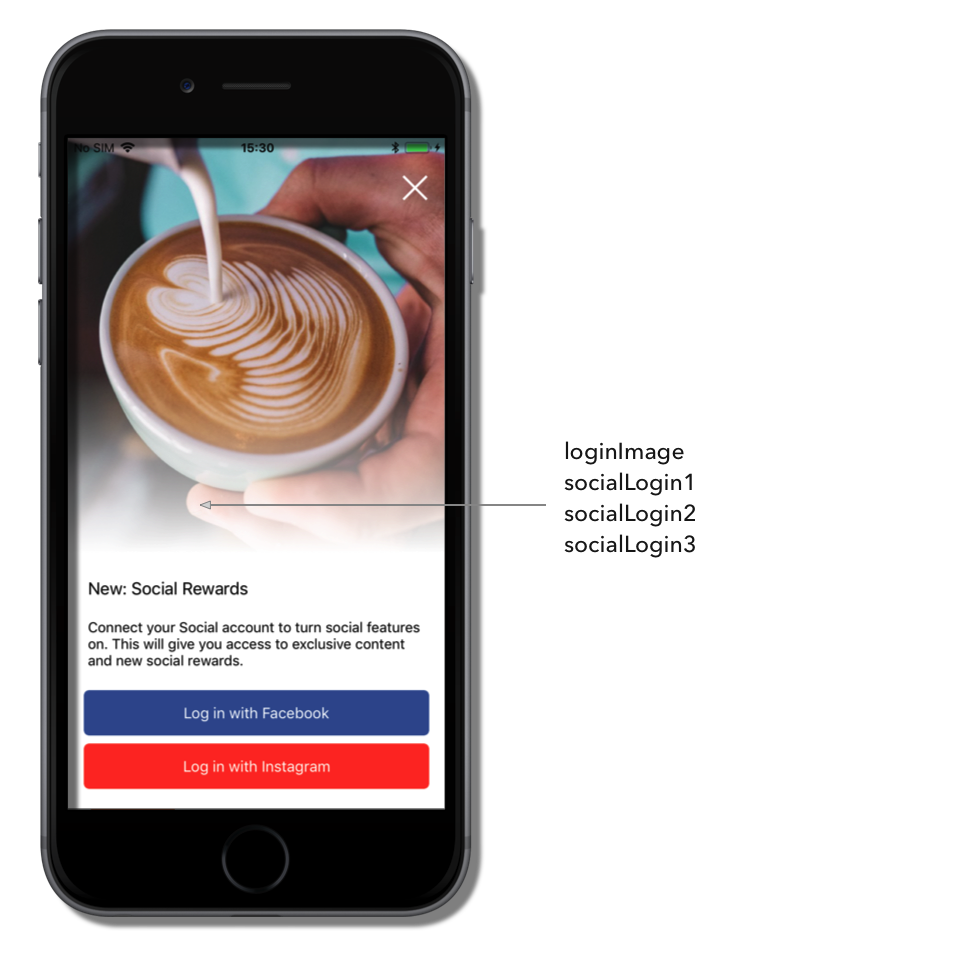
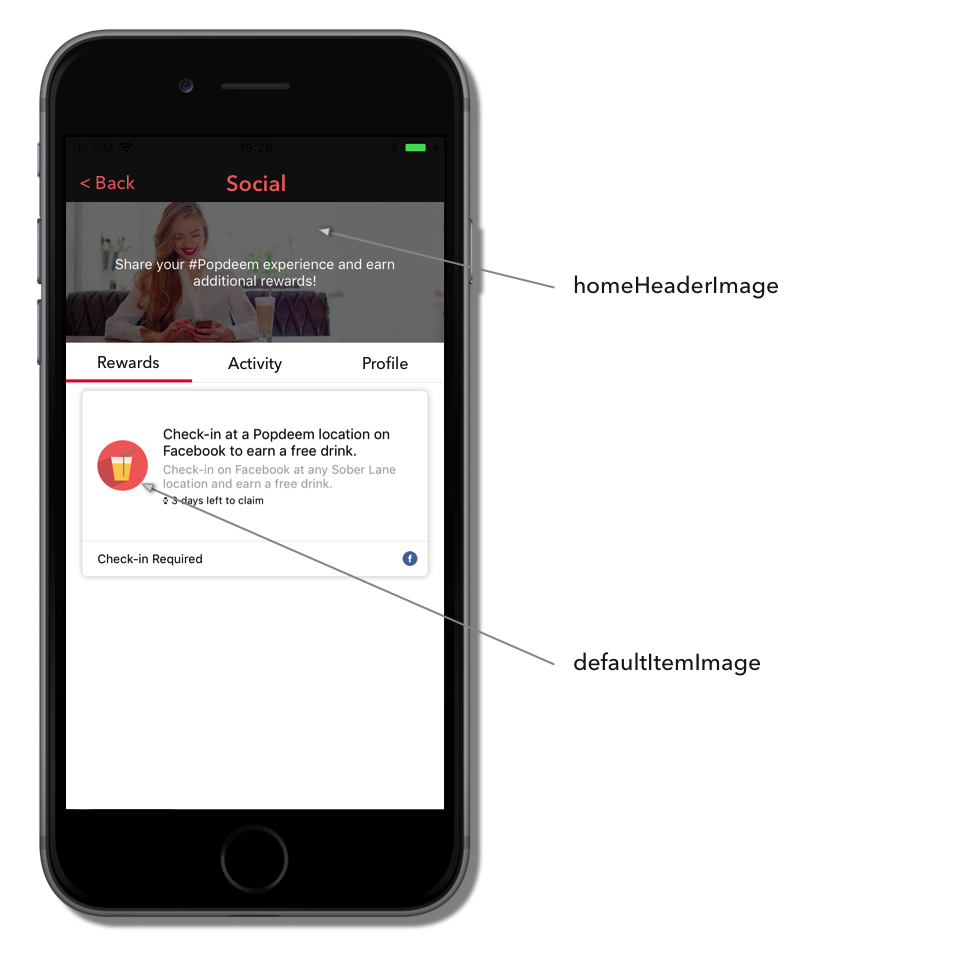
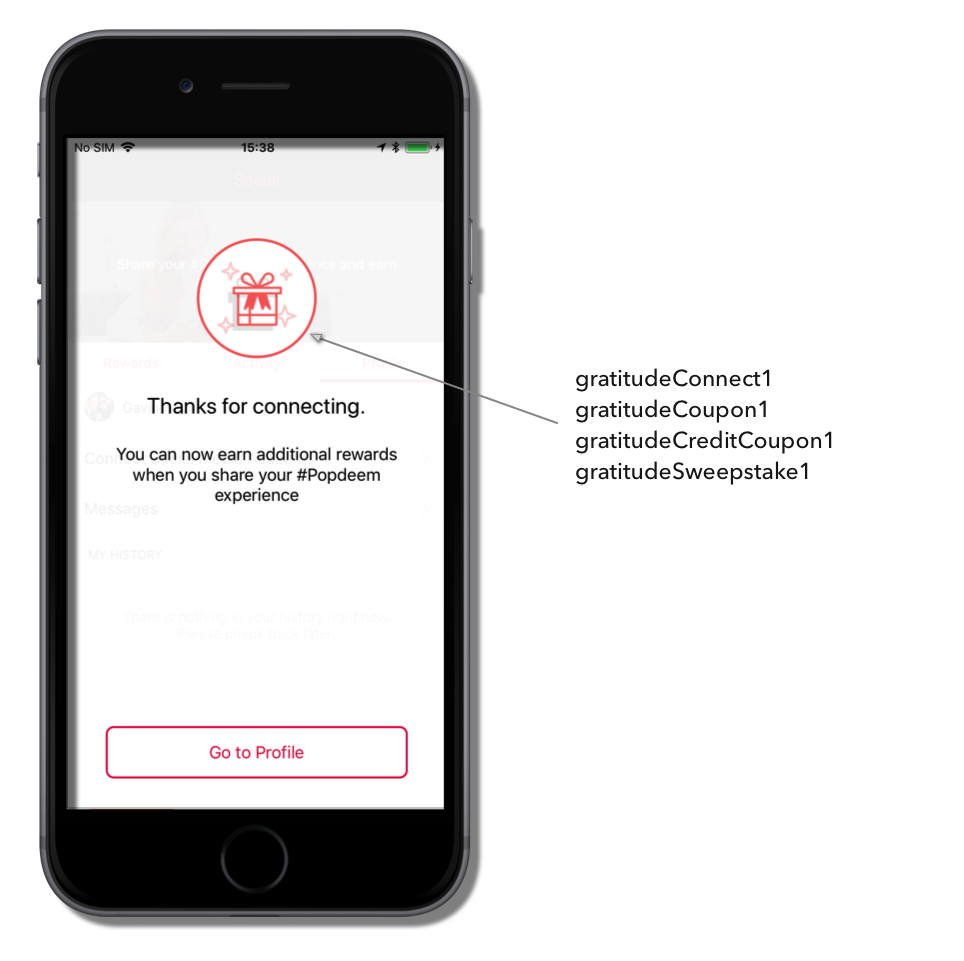
Several images in the Popdeem SDK are also configurable.
      "loginImage" : "pd_social_login_image",
      "socialLogin1" : "pd_social_login_image_1",
      "socialLogin2" : "pd_social_login_image_2",
      "socialLogin3" : "pd_social_login_image_3",


      "defaultItemImage" : "pduikit_starG",
      "homeHeaderImage" : "pd_header_image",


      "gratitudeConnect1" : "pd_gratitude_connect_image_1",
      "gratitudeCoupon1" : "pd_gratitude_coupon_image_1",
      "gratitudeCreditCoupon1" : "pd_gratitude_credit_image_1",
      "gratitudeSweepstake1" : "pd_gratitude_sweepstake_image_1"
To override these images, add the image asset to your bundle, and override these values in the Theme file, using just the image name, with no file extension.
Use Theme
"theme" is the name of the theme file included in your application bundle.
[PopdeemSDK setUpThemeFile:@"theme"];
PopdeemSDK.setUpThemeFile("theme")
When you are done, include this theme file in your project, and add the following to your application: didFinishLaunchingWithOptions: method in AppDelegate:
Fonts
The fonts used throughout the Popdeem SDK are also set in the theme file. The following fonts should be set:
- primaryFont
- boldFont
- lightFont
Print Fonts to Console
NSArray *fontFamilies = [UIFont familyNames];

for (int i = 0; i < [fontFamilies count]; i++) {
    NSString *fontFamily = [fontFamilies objectAtIndex:i];
    NSArray *fontNames = [UIFont fontNamesForFamilyName:[fontFamilies objectAtIndex:i]];
    NSLog (@"%@: %@", fontFamily, fontNames);
}
for fontFamily in UIFont.familyNames {
    let fontNames = UIFont.fontNames(forFamilyName: fontFamily)
    print("\(fontFamily): \(fontNames)")
}
The values for these keys should be the font name as it appears in the system. See across a handy snippet for printing system fonts in order to extract the correct name.
Strings
Localizable.strings
"popdeem.home.header.titleText" = "Share your #{YOUR_BRAND} experience and earn additional rewards!";
"popdeem.home.title" = "Social";

"popdeem.gratitude.creditCoupon.title.1" = "You are brilliant!";
"popdeem.gratitude.creditCoupon.body.1" = "Thanks for sharing. %@ has been added to your account.";
"popdeem.gratitude.creditCoupon.title.2" = "Thanks for sharing!";
"popdeem.gratitude.creditCoupon.body.2" = "%@ has been added to your account";
"popdeem.gratitude.creditCoupon.title.3" = "Amazing!";
"popdeem.gratitude.creditCoupon.body.3" = "Thanks for sharing your {YOUR_BRAND} moment. %@ has been added to your account";

"popdeem.gratitude.coupon.title.1" = "You are brilliant!";
"popdeem.gratitude.coupon.body.1" = "Thanks for sharing. Your reward has been added to your profile.";
"popdeem.gratitude.coupon.title.2" = "Thanks for sharing!";
"popdeem.gratitude.coupon.body.2" = "Your reward has been added to your profile";
"popdeem.gratitude.coupon.title.3" = "Amazing!";
"popdeem.gratitude.coupon.body.3" = "Thanks for sharing your {YOUR_BRAND} moment. Your reward has been added to your profile.";

"popdeem.gratitude.sweepstake.title.1" = "Thanks for sharing!";
"popdeem.gratitude.sweepstake.body.1" = "You have successfully entered the competition, check your profile to know when the winner is announced.";
"popdeem.gratitude.sweepstake.title.2" = "You are in!";
"popdeem.gratitude.sweepstake.body.2" = "You have been entered into the competition, we will let you know if you are the winner.";
"popdeem.gratitude.sweepstake.title.3" = "Great stuff.";
"popdeem.gratitude.sweepstake.body.3" = "Check your profile to find out when the winner is announced.";

"popdeem.gratitude.connect.title.1" = "Thanks for connecting.";
"popdeem.gratitude.connect.body.1" = "You can now earn additional rewards when you share your #{YOUR_BRAND} experience";
"popdeem.gratitude.connect.title.2" = "You're in!";
"popdeem.gratitude.connect.body.2" = "Share your #{YOUR_BRAND} experience to earn additional rewards.";
"popdeem.gratitude.connect.title.3" = "Success!";
"popdeem.gratitude.connect.body.3" = "You can now earn additional rewards and prizes when you share your #{YOUR_BRAND} moments on social media.";

"popdeem.sociallogin.title.1" = "New: Social Rewards.";
"popdeem.sociallogin.body.1" = "Connect with {YOUR_BRAND} on social media to earn additional rewards!";
"popdeem.sociallogin.title.2" = "New: Social Rewards.";
"popdeem.sociallogin.body.2" = "Connect with {YOUR_BRAND} on social media to earn additional rewards!";
"popdeem.sociallogin.title.3" = "New: Social Rewards.";
"popdeem.sociallogin.body.3" = "Connect with {YOUR_BRAND} on social media to earn additional rewards!";

"popdeem.claim.checkinLocation" = "CHECK-IN LOCATION";
All of the strings in the PopdeemSDK integration are translatable using the strings file. To override any strings in the SDK, simply add the corresponding string to your Localizable.strings.
If you need to translate the Popdeem SDK you can request a full list of the strings from daniel.f@popdeem.com

